Since last time
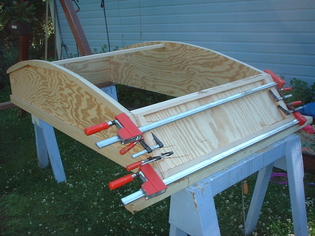
First thing this afternoon was to add the bow panel. The bottom edge of this panel had been beveled during our last work session and now the whole piece was to be added to the side panels and transom.
Since we took the side panel measurements off of the old Box, I knew that these side panels were at least ¼" too tall, maybe more. Cutting the bow and transom panels to size meant that they were at least ¼" too short, so those gunwales will need to be trimmed when this is over.
A couple of long Bessey K-body clamps, a handful of short, abused Bessey LM clamps, some Titebond III and some stainless deck screws took care of getting this panel in and keeping it in.

We next tackled the bottom panel to complete the hull. What was frustrating about this was that the panel we chose a few weeks ago had warped. That's usually fine since the hull shape is effectively a warped rocker, but this time it warped backwards to what I wanted. In this case, the convex side was the "C" side of this BC plywood (with lots of cracks) while the concave side (inside the boat) was smooth. That's why we have a backup sheet of plywood. This one seemed to have two "B" sides (smooth, no cracks) so we oriented the bulge on the right side of the hull, marked it up and used the circular saw to cut it out.
Here's where it got tricky. We got out all the clamps: big ones, small ones, good ones and decrepit ones. We dry fit the hull panel, got things aligned, slathered glue on the transom, sides and bow and got going.
Well we made it. I wish I had used a glue with a longer open time since the Titebond III only has a 20 minute open assembly time. Oh, well, too late now!
We removed the clamps as we added the stainless deck screws. I'm not sure how many are there, but we used quite a few to keep the curve fair.
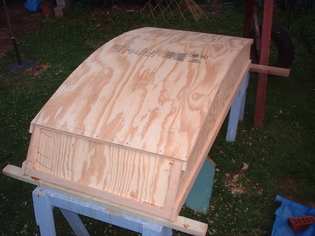
A block plane cleaned up the side edges and the fore and aft parts will take something a bit stronger.
What's next
Tomorrow we hope to get those overlapping parts of the hull trimmed off. Then there's some epoxy on the chine logs (where the hull and sides meet) followed by some fiberglass tape. We'll check the basement for some primer and if we can't find anything external, we'll probably end up at Home Despot looking for some Kilz Exterior. I wonder what mis-mixed porch paint they have there today?
